This is the final part of this series on the UV Scroll Component. These examples are meant to inspire you to make your Hubs scenes even better.
If you’ve arrived here from part 1 or part 2 of this series, you probably have a pretty solid understanding of how UV scrolling works. In this last part, we’re going to take a look at a few different examples that use Hubs’s UV Scroll component in less typical ways.
Rather than explain each step in full detail, I will instead focus on the overall concepts since these techniques can be applied in general ways to countless examples.
Hey, Blinkin'
Animating a texture on and off isn’t particularly special when it comes to rendered animation, but for real-time game engines, it’s not often supported as a built-in feature. Knowing what we do about UVs, we can get around this limitation with a little clever forethought.
This is one of my favorite techniques because the textures we create can be really small and simple. In fact, since I’ll be working with plain patches of color, I can make these images a few pixels at a time.
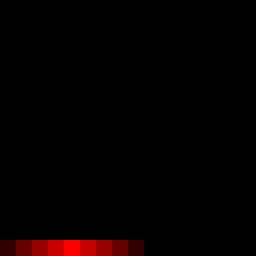
Let’s start with a small square texture that’s only 16 x 16 pixels. I’m painting this texture within Blender’s Image Editor, but you could use Photoshop, Krita, Procreate… heck, even MS Paint.
I’ll start by focusing on the bottom (horizontal) row of 16 pixels.

It's worth noting that working with pixel art can be tricky at first. Imaging software generally wants to smooth everything out and get rid of jagged lines and edges. So if you're saving an image that should remain blocky, you'll want to make sure to look for a setting called something like 'Interpolation' or 'Anti-aliasing' so you can choose the right option. For Blender, the setting is on the 'Image Texture' node.
If these pixels were to slide across a single face of a mesh, it would give the appearance of that mesh getting brighter and brighter red, then fading back down to black for a bit, then repeating as the texture wrapped back around to the start. If we use the UV Scroll Component’s ‘Increment’ parameter(s), we won’t see the hard edge of the pixels as they go by since they’ll ‘jump’ from one to the next.
1 (whole texture) divided by 16 (pixels across). In other words, the texture must increment 1/16th of its width each step. Remember, the Speed is independent so it can go as fast or slow as you like.
Jumping way ahead here, but a texture with lots of colorful gradients makes for some pretty cool results if all the UVs of the mesh are randomly placed throughout the UV space. If your nerd senses aren’t tingling here at the thought of making a cool ‘matrix code’ effect, I’m not sure what else I can do to excite you.
Don’t forget, you can also use the Y-increment to offset the texture vertically. This can further randomize the texture offset so you don’t see it loop as often. Finally, you may not want randomness at all, instead opting to strategically lay out your faces and UVs to make specific sequences of color like some classic game art.
Now that you’ve reached this stage of understanding, I’ll leave it to you to figure out how this digital number display works. The sideways-scrolling texture is 8 x 16 pixels and each column of green pixels represents a number from 0 to 9. The red pixels should be a clue…
What About Rotation?
While rotating textures is technically possible, it would require a code change to the UV Scroll component. However, you may find that it’s not really necessary if you know how to mess around with your mesh’s UVs. Just like we were able to distort the textures in the lava example from Part 2, we can create the illusion of rotation just by planning ahead with our UV layout. Even a simple gradient can create interesting results just by first rotating the UVs on an angle.
Animate those meshes
With all this fancy UV scrolling, it’s easy to forget that you can animate the mesh itself. By combining existing animation techniques with the UV Scroll component, the possibilities are endless. Be sure to review the glTF specifications for what types of animation are supported, but we’re generally talking about things like skeletal animation and morphing of meshes.
Here, I’m combining a very simple vertical UV scroll while I animated the object morphing into a new shape:
With a little bit of transparency and emission, my ghost could be reused throughout a Hubs scene:
Remember those flipbook-style textures we were using in part 1? You could animate one of the meshes in a simple circle– in this example, I curved the mesh a little bit to get rid of some of the flatness.
Final Thoughts
If you made it all the way through this series on UV Scrolling, congratulations! You hopefully have gained a better understanding of how all this works and maybe picked up a few tricks along the way. I’m always excited to see cool new ideas so I encourage you to visit the Hubs Discord and share your work-in-progress with our community.


