This article walks you through one way of setting up a Community Edition instance. For this guide, we are using Kubernetes on Google Cloud with our DNS and SMTP services on AWS. This guide is perfect for those familiar with the Hubs Cloud looking to get started quickly.
Introduction
In this step-by-step guide, you will learn how to quickly deploy an instance of Hubs Community Edition on Google Cloud using AWS's Route53 and Simple Email Service (SES). This guide is perfect for Hubs Cloud customers who are familiar with navigating AWS services and interested in learning about how to host Hubs on a new platform like Google Cloud.
To begin, it is important to understand some basic information about the technology that makes up Community Edition, Kubernetes, and how they work together. If you are already familiar with this information, you may skip ahead to the start of the tutorial at the subheading "Deployment Prerequisites".
Understanding the Hubs Community Edition Infrastructure
The product known as "Mozilla Hubs" is composed of several powerful pieces of software. For example, when you visit a Hub with your Web browser, you are interacting with the Hubs Client.
The Hubs Client itself interacts with several other pieces of software, such as:
- Reticulum | Hubs' networking and API server
- Dialog | Hubs' WebRTC voice and video communication server
The Hubs Client, Dialog, and Reticulum are just three components of a larger stack of software. Each of this stack's components are individually configured and networked to other components to make Hubs work properly.
Hubs Community Edition eliminates the need for developers to download, install, configure, connect, and update each of the stack's components individually. Community Edition simplifies and automates most of that complex deployment process using software called Kubernetes, which is a containerized software orchestration system.
An Introduction to Containerized Software
Consider the Web browser you are using right now to read this article:
- Unless that browser was installed onto your device from the factory, you first had to download a version of your browser that corresponds to your device's operating system.
- Next, you installed the browser, perhaps specifying a directory into which its application files were placed.
- After that, you opened the browser and may have signed into a Firefox account or a Google account.
- Then, you may have installed an ad blocker extension or a password manager.
- Finally, you might have navigated to a website and added it to your favorites bar...
Imagine if you could package up the complete state of your Web browser installation -- including its configuration settings, logged-in accounts, extensions, browser history, favorites, and more -- and make use of that package on any other computer, regardless of operating system.
Similarly, imagine if you could package up the complete state of any application -- its dependencies, libraries, configuration files, and application code -- and run that package on any other computer.
This is possible using open-source software called Docker. A Docker Container is a process executed on a computer running its own packaged and configured software. You can learn more about Docker and Docker Containers here on the official docs.
Other examples of popular software that is packed as a Docker Container include:
Wordpress | The blogging website system
Nextcloud | A suite of content collaboration software
Ubuntu | The entire Linux distribution
Many components of Hubs Community Edition run inside separate Docker Containers. By themselves, these containers don't know much about one another. If you were to run a Reticulum container on your computer without also running a Dialog container, anyone who connected to your Hub would be able to see each other, but not hear each other.
Therefore, we need a way for these containers to talk to each other. We need a way for people who connect to a Hub to also connect to that Hub's associated Dialog server. We also need a way to update the Dialog container's code without bringing down the Reticulum container. How do we coordinate all of these containers?
Kubernetes!
Kubernetes Introduction
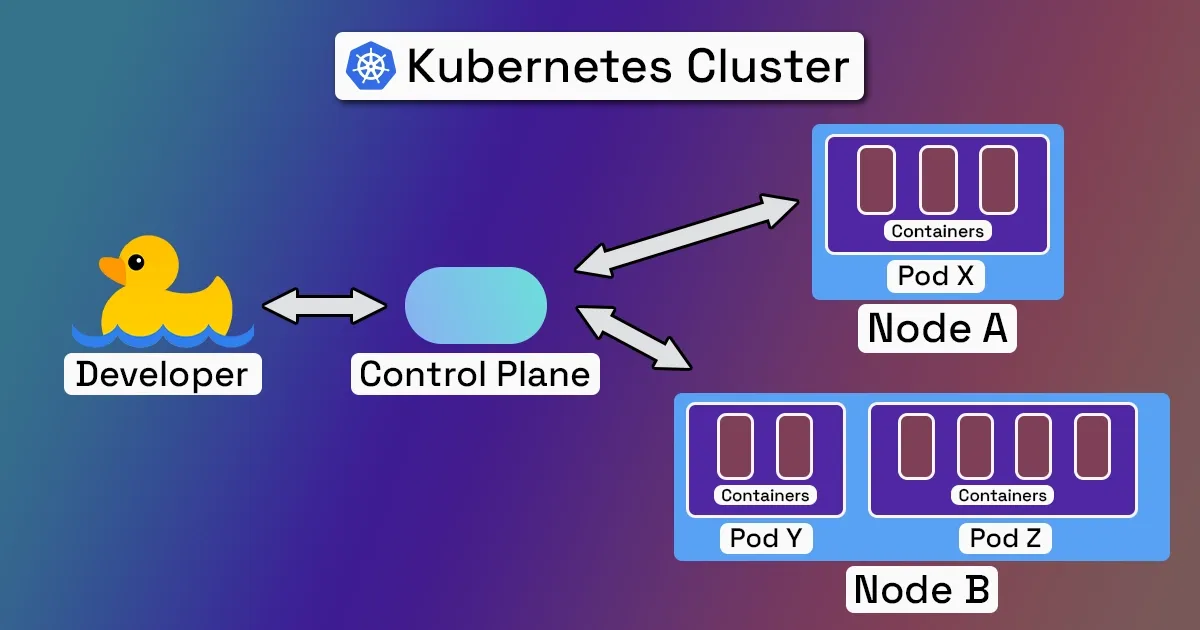
Kubernetes, often shortened to "K8s", acts as an organizer for containerized software. A Kubernetes deployment, called a "cluster", consists of two parts:
- A control plane that is responsible for maintaining the state of the cluster as defined by an administrator/developer.
- Nodes, which are virtual or physical computers that run software defined by the control plane. Each node contains a set of one or more pods, which share storage and network resources. Each pod runs one or more containers.
To deploy software built using Kubernetes, a developer must supply a Kubernetes executable with a plain-text configuration file describing the cluster's pods, those pods' containers, the computing resources that a container needs to function, networking information, and more. This configuration file is called a deployment spec.
ret.prod.220712.200 of the Reticulum server on port 9100 and version dialog.prod.220303.63 of the Dialog server on port 4443."The control plane would ingest that configuration file and instruct its nodes to download and run that specific, containerized software.
Kubernetes clusters can be deployed on many types of computers, including:
- Your home desktop computer
- Two $35 Raspberry Pi Computers
- Computers owned by a cloud services provider, such as:
- Google Kubernetes Engine
- Amazon Elastic Kubernetes Service
- Microsoft Azure Kubernetes Service
- DigitalOcean Kubernetes
Community Edition's Containerized Services
Here is a rundown of each container that makes up Hubs Community Edition:
- Hubs | The Hubs Client for Web browsers.
- Spoke | A web-based content authorizing tool used to create custom 3D environments for Hubs.
- Reticulum | Hubs' networking and API server. This handles authorization, avatar positioning, object manipulation, and way more.
- Dialog | A WebRTC audio and video communication server. This contains a WebRTC Selective Forwarding Unit. For more information about how Hubs uses WebRTC, check out this resource.
- Coturn | A TURN and STUN server used for WebRTC communication. For more information about how Hubs uses WebRTC, check out this resource.
- Nearspark | A service used to generate thumbnails from images.
- Speelycaptor | A service used to convert video to a Hubs-compatible format. Uses ffmpeg.
- PgBouncer | A lightweight connection pooler for PostgreSQL. Rather than making new, expensive PostgreSQL database connections for every client or query, a connection pooler creates a long-lived group of connections to a database, and reuses those connections as necessary. This improves database access performance and availability.
- Photomnemonic | A service used to take screenshots of websites.
After deploying your own version of Community Edition, you will be able to see these containerized services running in their own individual pod. Now that all of those details are out of the way, let's get to the deployment tutorial!
Deployment Prerequisites
To successfully deploy Community Edition, certain prerequisites must be met. The requirements discussed below are tailored to this case study and do not precisely match those in the Communit Edition codebase. It is important to note that this tutorial was created using a 2021 M1 Macbook Pro running macOS Ventura 13.1 . The individual commands used to deploy Community Edition may depend on your device and operating system.
Part 1: Before getting started, we need to configure billing on our Amazon Web Services and Google Cloud Platform accounts. This guide does not go through the individual steps of setting up your account and billing information, but you can find more information about the setup process at the following links: AWS | GCP
Part 2: We will be using the following free, 3rd-party applications:
A. VSCode | A code editor for us to configure and deploy Community Edition.
B. Lens | An interface where we can inspect and manage our K8s cluster.
Part 3: We need to make sure our computer has the following software installed. We have included the commands that we ran for installation:
A. Homebrew
/bin/bash -c "$(curl -fsSL https://raw.githubusercontent.com/Homebrew/install/HEAD/install.sh)"brew install --cask google-cloud-sdkC. Kubectl
curl -LO "https://dl.k8s.io/release/$(curl -L -s https://dl.k8s.io/release/stable.txt)/bin/darwin/arm64/kubectl"D. gettext
brew install gettextStep 1: Configuring your DNS on AWS's Route53
TIf you have set up a Hubs Cloud instance on AWS, you will be familiar with the process of registering a domain on Route53. In fact, you may even have an existing domain that you wish to use for your Community Edition instance. However, unlike Hubs Cloud, you need only one registered domain in order to deploy Community Edition.
If you do not already own a domain that you plan to use for this deployment, you will need to purchase on on AWS Route53:
- Navigate to Route53 on the AWS console.
- Select the "Registered Domains" tab in the left-hand toolbar.
- Select the "Register Domain" button, search for your desired domain, and follow the checkout process to purchase your domain.
- Wait for a confirmation email indicating that your purchase was successful. You will also have to wait for the registration process to complete.
- Lastly, disable Transfer Lock on your domain. This can be done by selecting your domain in the "Registered Domains" tab and clicking the "disable" hyperlink next to "Transfer Lock".
Once we have registered our desired domain, we need to create four records...
- Navigate to the "Hosted Zones" tab in the left-hand toolbar and click on your domain.
- In the domain's details, you will select "Create Record" to create 4 A-records with placeholder values. Don't worry, we will update these later:
a. Record Name: {keep blank}
Record Type: A
Value: 0.0.0.0 (placeholder)
b. Record Name: assets
Record Type: A
Value: 0.0.0.0 (placeholder)
c. Record Name: stream
Record Type: A
Value: 0.0.0.0 (placeholder)
d. Record Name: cors
Record Type: A
Value: 0.0.0.0 (placeholder)
After this is complete, we have properly configured our domain for deployment. Once again, we will come back to update those placeholder record values later in the guide.
Step 2: Configuring your SMTP on AWS's Simple Email Service (SES)
Hubs relies on the ability to associate a user's email address with important account information, such as their Spoke scenes, rooms, avatars, and more. We will need to configure an Simple Mail Transfer Protocol service (SMTP) in order for our instance to send emails to users.
- Navigate to "Amazon Simple Email Service" in the AWS console.
- Select "SMTP settings" in the left-hand toolbar.
- Make note of your SMTP endpoint URL, this will be used later.
- Select the "Create SMTP credentials" button.
- (Optional) On the "Specify User Details" page, you may customize your assigned IAM user name.
- Verify that the following keys in "Permissions policy for user" have the corresponding values:
"Effect": "Allow"
"Action": "ses:SendRawEmail"
"Resource": "*" - Select "Create User".
- Download or copy the SMTP user name and SMTP password. These will be used when configuring the Community Edition deployment spec later in the guide.
Once this is complete, our email service is properly configured for deployment!
Step 3: Create Your Kubernetes Cluster using Google Cloud Kubernetes Engine
Next, we need to create a new Kubernetes cluster to hold our Community Edition containers. We can create this cluster using the command line with google-cloud-sdk installed:
- Log in to the google cloud sdk.
gcloud auth login2. Check that you are working in the project where you would like to create your cluster. If you need to create a project, follow these steps.
gcloud config list3. If you are not working in the correct project, run the following command to change to the correct project.
gcloud config set project <YOUR_PROJECT_ID>
4. Create your K8s cluster. We generally recommend assigning your cluster to the zone nearest to your intended user base. You can find more information on zones here.
gcloud container clusters create <YOUR_DESIRED_NAMESPACE> --zone=<YOUR_DESIRED_ZONE>5. Wait for your cluster to be configured. This may take several minutes. When completed, you will receive confirmation and information about your cluster.
Created [https://container.googleapis.com/v1/projects/YOUR_PROJECT_ID/zones/YOUR_DESIRED_ZONE/clusters/YOUR_DESIRED_NAMESPACE].6. After creating your cluster, you will need to make sure you have the following ports open for connections...
- TCP: 80, 443, 4443, 5349
- UDP: 35000 -> 60000
In GCP, you can do this by going to VPC Network > all > Create Firewall Rule. Make sure you select the network for your cluster.
Our K8s cluster is now ready to receive our deployment spec for Community Edition!
Step 4: Download, Configure, and Deploy Community Edition
The code that makes up Community Edition currently lives in this section of the Hubs Cloud GitHub repository. In order to deploy it to our K8s cluster, we must download the repository, edit the deployment scripts with information from our chosen services, and deploy the configuration files.
1. Clone the GitHub repository using the command line in VSCode.
git clone https://github.com/mozilla/hubs-cloud.git2. Move into the community-edition directory.
cd community-edition3. Editing render_hcce.sh in VSCode, replace the following required parameters with your chosen services. You will also configure multiple secret passwords that you should save locally on your device:
HUB_DOMAIN | Your domain from Route53.
ADM_EMAIL | The email address to be assigned admin privileges on creation.
Namespace | The namespace to use within your Kubernetes cluster.
DB_PASS | A secret password chosen by you.
SMTP_SERVER | The SMTP endpoint URL from SES.
SMTP_PORT | 587
SMTP_USER | The SMTP user name from SES.
SMTP_PASS | The SMTP password from SES.
NODE_COOKIE | A secret password chosen by you.
GUARDIAN_KEY | A secret password chosen by you.
PHX_KEY | A secret password chosen by you.
4. (Optional) Editing render_hcce.sh in VSCode, replace the SKETCHFAB_API_KEY and TENOR_API_KEY with credentials from these services. If you would not like to configure Sketchfab (for searching 3D models) or Tenor (for searching animated GIFs) you can simply leave these values as they are.
5. Once you have finished configuring the deployment script, run the following command to create the deployment spec and apply it to your cluster.
bash render_hcce.sh && kubectl apply -f hcce.yaml6. Wait for the deployment to complete. This may take several minutes.
7. Verify the deployment with the following command. You should see 11 pods listed in the returned value.
kubectl get deployment -n NAMESPACE_WITHIN_CLUSTER8. If you would like to look deeper, you can look into the details of each pod to make sure the intended values are present. We recommend verifying the information in the Reticulum pod.
kubectl describe deployment POD_NAME -n NAMESPACE_WITHIN_CLUSTERrender_hcce.sh were edited from base64 <secret> -w 0 to base64 -i <secret> in order to run on M1 macOS 13.1.Step 5: Expose Services
Before we can access our Community Edition instance, we need to point our domain to its automatically assigned external IP.
1. Get your instance's external IP address.
kubectl -n NAMESPACE_WITHIN_CLUSTER get svc lb2. Navigate back to the "Hosted Zones" tab of AWS Route53 and select your domain.
3. Replace the placeholder values of all four A-records you created previously with your instance's external IP address. These should be:
<HUB_DOMAIN>
assets.<HUB_DOMAIN>
stream.<HUB_DOMAIN>
cors.<HUB_DOMAIN>
4. Save all records and wait a few minutes for the changes to propogate.
Step 6: Verify and Manage Your Instance with Lens
Once you have exposed your IP to your domain, you should now be able to begin using your Community Edition instance at its intended domain.
Connecting to your domain for the first time...
- Attempt to connect to your domain. Since we have not yet configured certificates for our Hub, we will need to 'self-sign' the certificates. Your Web browser will warn you when joining an domain without certificates and will provide you the option to view the page anyway. On Firefox, this is achieved by clicking "Advanced" and "Accept the Risk and Continue".
- The first time you join your URL, you should be prompted to sign-in using your email address.
Looking into Reticulum logs...
- It is useful to look into the backend of your K8s cluster using a free interface called Lens. During the setup process, Lens should automatically detect all accessible clusters associated with your Google Cloud account. You can then look into your individual cluster and its pods using the left-hand toolbar.
- Select the pod for Reticulum and open its logs in the top right-hand corner of the details page. The logs icon is indicated by four horizontal lines with the fourth line shorter than the others.
- After selecting the Reticulum logs, you should be able to view the processes occurring on the backend of your instance.
Verify that SMTP is working correctly...
- With the Reticulum logs open, attempt to sign-in to your instance in the Web browser with your ADM_EMAIL email address.
- If successful, Reticulum should register the request and you should receive an email from noreply@<HUB_DOMAIN>. After this, you can begin to create rooms, upload assets, and deploy scenes to your Hub!
- If unsuccessful, Reticulum should log the reason for the error, which you can then use to troubleshoot.
Verify your configuration values...
1. Back in Lens, select the "Pods" tab in the left-hand toolbar and select your Reticulum pod.
2. Open the "Pod Shell" to ssh into your Reticulum pod. This icon should be immediately left of the "Pod Logs" icon.
3. In the Pod Shell, run the following command:
cat config.toml4. This will return the values you have used to configure your deployment. Verify the values running match your intended values.
Update configuration values and redeploy...
- You can re-run the command to deploy Community Edition with updated configuration values at any time.
- After re-deploying your configuration, you will have to cycle your current pods for any changes to take effect. This can be achieved by simply deleting all/individual pods using the Lens interface on the "Pods" tab. Thanks to Kubernetes, Community Edition will automatically attempt to create a new pod containing the latest updates.
Step 7: Configure Certificates
The last step of this guide is to configure certificates in order to secure your instance and get rid of the automatic SSL warnings on your Web browser. The Community Edition GitHub README specifies that there are two options for configuring certificates:
A. You can deploy the Hubs team's certbotbot service.
B. You can manually configure certificates using the command line or an interface like Lens.
For this tutorial, we will stick with Option A.
1. Editing cbb.sh in VSCode, replace the following required parameters with your chosen configurations:
ADM_EMAIL | The same email address you specified in render_hcce.sh
HUB_DOMAIN | Your domain from Route53.
Namespace | YOUR_DESIRED_NAMESPACE from your K8s cluster.
2. Once you have configured the required parameters, run the following command to add the service to your K8s cluster. The script will step through issuing certificates for <you-domain>, stream.<your-domain>, cors.<your-domain>, and assets.<your-domain>.
bash cbb.sh3. After you have issued certificates for all four of your subdomains, you will need to comment out the default certificate user by haproxy on initial deployment. Search for --default-ssl-certificate={your-namespace}/cert-hcce and comment out/delete it before re-applying your yaml file with kubectl apply -f {path to your hcce.yaml file} -n {your-namespace}.
Once this is complete, you should be able to access your domain without any ssl issues!
Conclusion
We hope that this guide has been informative about the technology that makes up Hubs Community Edition and helpful as you set up your own instance. As a reminder, this guide is a quick start and there are many upgrades you should consider to make your version of Community Edition production-ready.
- Scalability | Instances created with this method can support ~15 concurrent users. You can increase capacity by adding additional services for horizontal and vertical scaling.
- AWS SMTP sandbox | Instances created with this method may have limits on the emails they can send to users of their Hub. The process for requesting a limit increase is the same as Hubs Cloud and is documented here.
- Dev Ops for Custom Apps | Instances created with this method will automatically track with the latest version of Hubs codebases. We know that many developers will want to deploy their own versions of the Hubs Client, Reticulum, and Spoke. Doing so will require you to set up your own deployment system. Stay tuned for more documentation about this process in the coming months.
- Migrate Your Hubs Cloud Data | Existing Hubs Cloud customers may want to migrate their existing data to their Community Edition instance. Stay tuned as we release automated tools and documentation over the coming months to make this process fast and easy.
We are so excited to see how the community uses this new technology and can't wait to hear more from you about how to improve Community Edition. The best way to share your thoughts and stay up-to-date on the latest developments is to join our Discord server and check out the #community-edition channel.
Lastly, if you have experience with Kubernetes or self-hosting Hubs and want to share your own documentation, we are currently accepting applications from capable developers for paid documentation commissions. Complete this interest form and we will contact you with more details.
Update: December 2023
Hey Readers, I am updating this document with a new section on configuring settings found in Hubs Cloud's version of the admin panel and how to deploy a custom version of any of the services that make up Hubs using the process that the Hubs team uses!
Configure Admin Settings
Hubs Community Edition uses much of the same code as the Hubs Subscription, including its version of the admin panel. A key difference between this version of the admin panel and Hubs Cloud's version of the admin panel is the difference in fields to configure certain settings, including...
- Extra Content Security Policy Rules, including those which allow developers to access external APIs
- Extra Headers, HTML, and scripts for avatars, rooms, and scenes
With Community Edition, these settings are still configurable when deploying your charts to a K8s cluster. To configure these, look config.toml.template and enter your desired values into these portions of the chart:
[ret."Elixir.RetWeb.Plugs.AddCSP"]
child_src = ""
connect_src = "wss://*.stream.<DOMAIN>:4443"
font_src = ""
form_action = ""
frame_src = ""
img_src = "nearspark.reticulum.io"
manifest_src = ""
media_src = ""
script_src = ""
style_src = ""
worker_src = ""

[ret."Elixir.RetWeb.PageController"]
skip_cache = false
extra_avatar_headers = ""
extra_index_headers = ""
extra_room_headers = ""
extra_scene_headers = ""

extra_avatar_html = ""
extra_index_html = ""
extra_room_html = ""
extra_scene_html = ""

extra_avatar_script = ""
extra_index_script = ""
extra_room_script = ""
extra_scene_script = ""
For example, if I want to allow my hub to call the OpenAI APIs for prompt moderation and image generation, my code for script_src would look like the following with each url separated by a single space:
script_src = "https://api.openai.com/v1/moderations https://api.openai.com/v1/images/generations"Deploy Custom Apps
By default, Community Edition tracks with the latest release of the Hubs code bases contained in our public docker registries. Many developers may wish to deploy their own version of Hubs' various code bases. Here, we'll step through the process that the Hubs teams uses with GitHub Actions to build your own docker registries and how to have your Community Edition instance use this code.
- First, create a docker hub account and, optionally, a registry for your image. By default, docker hub will create a registry with your username.
- Fork the Hubs code base you would like to customize in GitHub (you must have a GitHub account to do so). For this tutorial, we'll use the Hubs client and use the master branch as a starting point for adding our customizations.
- When you have made your customizations and are ready to deploy, go to
.github/workflows/and add a file calledce-build.ymland populate with this code created by Hubs Team member, Brandon Patterson. Once complete, ensure these changes are checked-in and merged with your fork's master branch. - Navigate to the Actions section of your GitHub repository. After adding and committing
ce-build.yml, you should see “ce” listed as an action. - Go to the settings tab of your fork, select "Secrets and Variables" and "actions". Create a new repository secret titled "DOCKER_HUB_PWD". In the secret value, either input your docker hub password or create an access token in docker hub and use the password from that secret.
- After saving the secret, go back to the "Actions" tab, select "ce" and select "Run Workflow." In the pop-up, choose the master branch, leave the "Code path" blank, enter your docker hub username, make sure the dockerfile is
RetPageOriginDockerfile, and enter your docker hub registry name. - Wait for the build to complete successfully. You can check the successful deployment in docker hub.
- Lastly, we have to update our community edition deployment to use our customized version of the Hubs client. Within
hcce.yaml, instead of pointing tomozillareality/hubs:stable-latest, point to your docker image with the deployed code.
Update: March 2024
Hey Readers, I am updating this document with a new section on an alternative method of running render_hcce.sh using Docker and how to set up persistent volumes.
Using Docker for render_hcce.sh
render_hcce.sh is the script that allows us to populate our hcce.yam file with our instance specifications. This script outputs a hcce.yaml file that we can then deploy to our instance. Out of the box, developers who run render_hcce.sh may encounter issues unique to their operating system depending on their device's compatibility with the script. Well, I would like to show you how you can use Docker to run render_hcce.sh, avoiding any issues that may occur with your operating system. Thank you to Alex Griggs (aka @Doginal on github) for your PR contributing this method!
Prerequisites
In order to attempt this method, you must have Docker installed on your device.
How To...
1. Create a new file titled Dockerfile in the community-edition directory of your local version of the hubs-cloud repo. Populate it with this code...
from ubuntu:22.04

RUN apt update && apt upgrade -y
RUN apt install -y openssl npm gettext-base
RUN mkdir -p /app
WORKDIR /app
COPY . .
RUN chmod +x /app/render_hcce.sh

RUN npm install pem-jwk -g

CMD [ "/bin/bash", "-c", "/app/render_hcce.sh" ]
2. Build your container by running docker build . -t hubs-ce-builder:latest.
3. Run the following command to create your hcce.yaml file: docker run --rm -it -v {path-to-your-community-edition-director}:/app hubs-ce-builder:latest
This command should create a hcce.yaml file that you can then apply to your instance, all while avoiding issues unique to your operating system!
Persistent Volumes
Out of the box, Community Edition instances will attempt to write data, such as scene information or custom avatars, to the pgsql and reticulum pods. When we delete these pods, we also delete the data associated with them. Persistent Volumes allow us to move our data outside of the pod lifecycle to ensure that our data will be available even after our pods delete and respawn. Please note, the method outlined below only works if you have one pgsql instance and one reticulum instance running on your node cluster. Thank you to Hrithik Tiwari for helping contribute this knowledge to the community!
- Create a yaml file for our pgsql pod's persistent volume and persistent volume claim called persist-pgsql.yaml with the following code. Be sure to replace with your namespace and customize the storage capacity based on your needs.
---
# pgsql persistent storage
---
apiVersion: v1
kind: PersistentVolume
metadata:
  name: pgsql-pv
  labels:
    type: local
spec:
  storageClassName: manual
  capacity:
    storage: 10Gi
  accessModes:
    - ReadWriteMany
  persistentVolumeReclaimPolicy: Retain
  hostPath:
    path: "/tmp/pgsql_data"
    type: DirectoryOrCreate
---
apiVersion: v1
kind: PersistentVolumeClaim
metadata:
  name: pgsql-pvc
  namespace: {REPLACE-WITH-YOUR-NAMESPACE}
spec:
  accessModes:
    - ReadWriteOnce
  resources:
    requests:
      storage: 10Gi
---
2. Apply the file by running kubectl apply -f {path-to-your-persist-pgsql.yaml-file}.
3. Repeat the process for the reticulum pod's persistent volume and persistent volume claim. Create a file titled persist-ret.yaml. Be sure to replace with your namespace and customize the storage capacity based on your needs.
---
# reticulum persistent storage
---
apiVersion: v1
kind: PersistentVolume
metadata:
  name: ret-pv
  labels:
    type: local
spec:
  storageClassName: manual
  capacity:
    storage: 10Gi
  accessModes:
    - ReadWriteMany
  persistentVolumeReclaimPolicy: Retain
  hostPath:
    path: "/tmp/ret_storage_data"
    type: DirectoryOrCreate
---
apiVersion: v1
kind: PersistentVolumeClaim
metadata:
  name: ret-pvc
  namespace: {REPLACE-WITH-YOUR-NAMESPACE}
spec:
  accessModes:
    - ReadWriteOnce
  resources:
    requests:
      storage: 10Gi
---
4. Apply the file by running kubectl apply -f {path-to-your-persist-ret.yaml-file}.
5. After we have applied our persistent volumes and persistent volume claims, we will need to reference them in our hcce.yaml file under the specifications for pgsql and reticulum respectively. Search for path: /tmp/ret_storage_data and replace the volumes spec for reticulum with the following code:
volumes:
	- name: storage
    	persistentVolumeClaim:
            claimName: ret-pvc
          	# hostPath:
          		# path: /tmp/ret_storage_data
          		# type: DirectoryOrCreate
        - name: config
          configMap:
            name: ret-config
6. Repeat for pgsql. Search for path: /tmp/pgsql_data and replace the volumes spec for pgsql with the following code:
volumes:
	- name: postgresql-data
    	persistentVolumeClaim:
          	claimName: pgsql-pvc
        # hostPath:
          	# path: /tmp/pgsql_data
7. Apply your updated hcce.yaml file using kubectl apply -f {path-to-your-yaml} -n {your-namespace}.
After this is complete, our reticulum and pgsql pods will write data to our node cluster, not each individual pod, allowing data to persist regardless of the pod lifecycle or which node our pod may be scheduled on.