
Getting Started with Hubs
In the following guide we'll show you the basics of Hubs! (Prefer a video? Click here.)
To get started, head to hubs.mozilla.com. Make your own room by clicking “Create a Room.”
🎉 Congratulations - you now have your very own virtual space! 🎉
Enter the Room
Before entering, you are in the room's lobby. From here, you can see and hear what's going on inside the room, and you can only interact with others using text chat. Entering the room can be a bit different depending on the type of device you are using.
On a desktop computer?
- Click "Enter Room" and follow the prompts to select a name/avatar and enable the mic.
On a VR headset or mobile device?
- Take a look at the instructions in the Hubs documentation.
Explore Hubs
Look around
Try exploring your new space. On desktop use your WASD or arrow keys to move around. You can also press your right mouse button to teleport to a different location. Rotate your view using the Q and E keys, or hold down your left mouse button and drag.
For VR and mobile controls see our list of Hubs controls.
User Interface
Take a moment to take a look around the user interface. You can mute your mic, take photos, share your screen, create objects, and more. We'll introduce the basics of some of these controls in this guide. For more detailed information check out the Hubs Features section of the documentation.

Import Media
In Hubs you can import 3D models, images, videos and PDFs from all over the web including SketchFab, Google Poly, SoundCloud, Vimeo, Twitch, Crunchyroll, and more.
Try searching for content in the Media Browser (the magic wand button at the top of the screen).
You can also add media by dragging and dropping a file into the room, or by copying (ctrl+c or command+c) a URL and then pasting it in the room (ctrl+v or command+v).
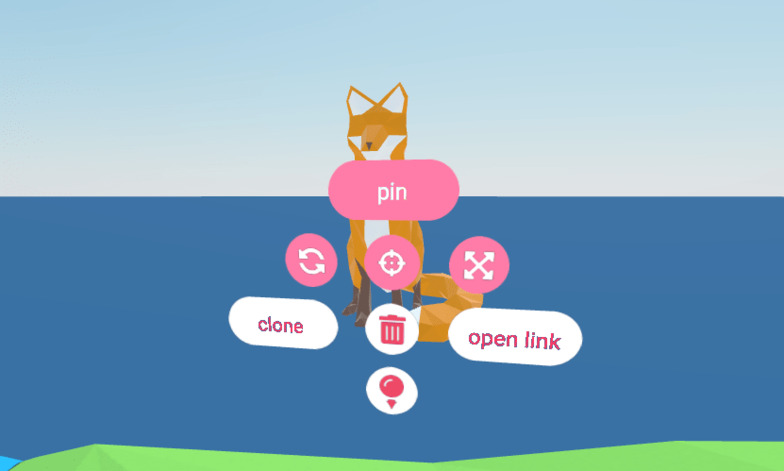
Object Menus
Additional controls for objects, videos, and drawings can be found in their object menus.
To reveal these controls, hover your cursor over the object and press the space bar or tab key on desktop.
For VR and mobile controls see our complete list of Hubs Controls.
Avatar Menus
You can open up a menu on users just like on objects. This lets you control their volume or hide them from your view. If you are a room owner or moderator you will have extra permissions, like being able to mute the user's mic or temporarily kick them from the room.
![]()
Change the Scene
You can change your scene to suit the mood of your event. There are lots of environments to choose from in our scene database, or you can create your own custom worlds using our scene editor Spoke. Explore the scene browser by opening the dropdown menu and selecting Choose a Scene.
Note, only room moderators can change the scene. You also need to be signed in using your email address. Logging in is not required to use Hubs but doing so provides benefits such as being able to save favorite rooms, and upload custom avatars. All we need is an email address to authenticate your account — no additional information is required.
Invite Friends
Your new space is private, and no one else can join until you invite them.
When you are ready to invite others click the "Share" button at the top of your screen. Copy the room URL or shortlink code and send it to your friends.

Next Steps
This was just a quick overview of some of Hubs' basic features. For a detailed overview of what you can do in Hubs check out Hubs Features in the documentation.